
- Gun Placement -
The
relative power of offensive battle units in our hobby is immensely integral to
the overall combat effectiveness of a ship. The relative power of a gun is
influenced by the rules of the hobby which were created to try to maintain a
degree of balance across multiple ship types, the theoretical play style of a
certain ship or captain, the design of the actual ship which is being modeled,
and the way the guns are placed/aimed regarding the relative power of various
gun placement positions as it relates to ease of scoring successful hits. This
article will serve to explain relative advantages and disadvantages of various
gun setups.
Applicable
Rules
Firstly,
a basic grasp of the rules and the theoretical gameplay balance which is trying
to be created should be considered. Our rules are maintained and voted upon by
the members of the IRCWCC - Rules.
The basic concept is that the ships are roughly scaled in terms of the relative
power of the actual ship which existed in real life, and allocated a number of
battle units. Battle units can be a pump (defensive unit) or a gun (offensive
unit). One of the really unique aspects of our hobby is that offensive and
defensive unit allocation and placement it is dependent on captain preference,
however there are numerous rules dictating where guns can be placed on a ship.
Ships (with only a handful of exceptions) are allowed to arm the ship’s main armaments
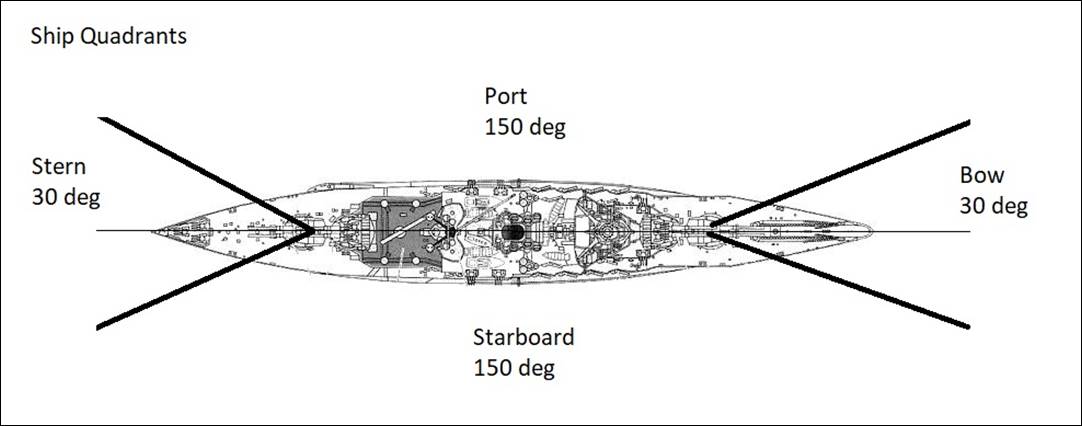
only. For the purposes of defining where a gun can be positioned/aimed, our
ships are divided in to four uneven quadrants consisting of 30 degree sectors
off both the bow and stern (15 degrees to each side of midline) and the
remaining 150 degree arc between those sectors to both the port and starboard
sides of the ship (diagram 1). Other than a few exceptions, ships are not
allowed to cover all 4 of these quadrants at once, that is to say that at least
1 quadrant must be left unarmed and vulnerable to being attacked. Smaller ships
class 3 and below (cruisers, destroyers, etc) are not
allowed to have cannons to either side quadrant, with the larger class 3
pre-dreadnaughts as the notable exception. The thought is that a narrow beam of
small ships leads to instability and the potentially dangerous upward firing of
projectiles. Additionally, for ships class 4 and higher which are allowed to
have side firing guns, the general rule is that only 2 side firing guns are
allowed, with a few notable exceptions for larger ships. There are no limits to
number of guns firing to stern or bow quadrants.
Diagram
1
Play
Style
Secondly,
the theoretical play style of a certain ship or the play style of a particular
captain should be considered. Ship selection, what guns to arm in the ship, and
where and how to point them are all heavily dependent on what a captain is
going to try to accomplish in battle. Longer range run and gun styles will
feature stern guns and ranged out sidemounts in an
attempt to keep the enemies at relatively longer ranges as to protect your own
ship by virtue of physical distance. Hug and slug styles will feature guns
aimed point blank range, sacrificing a degree of self-preservation for easier
to hit shots. Part of the variability will be based on what types of ships
other people you battle with are using, individual skill, as well as other
larger trends in the hobby as things naturally shift and evolve over time.
Design
of the ship
Our
ships are modeled after actual war ships that existed 1906-1946. Some ships due
to a variety of factors are better than others. The shape of the hull and the
location and number of the main armaments are hugely important. See the
article: Best
Ships
Relative
Gun Power
Finally,
the relative power of an individual gun is actually quite complicated. There
exists a balance between relative ease of hitting the intended target, the
amount of damage/points one can score per successful hit or per trigger pull,
and the degree you must put your own ship in harm’s way to score a hit. A basic
understanding of a few principles of physics and how they apply within our
rules is important. Some primary principles are:
1. Each hole in an enemy ship not only brings it closer
to sinking, but also scores points. As of 2017 above the water line hits are 10
points, on the water line hits are 20 points, and below the water line hits are
30 points. Previously values were 10-25-50. This is scaled to reflect both the
ease of accomplishing hits to these 3 areas, the relative danger you have to
put your ship in to score hits, and the relative value that the damage
constitutes in terms of ship sinking ability.
2. For reference, averaged over may years, it has been
found to take on average 81 total holes to sink a ship: see the article Damage at Nats. Additionally, on average it is estimated that
only 15-30% of all shots fired make a hole.
3. By rule each ship has a minimum of 1 inch below the
water line of targetable hull, and all of the hull above the water line is
targetable hull except for a 1/4 or 3/8 inch deck rim.
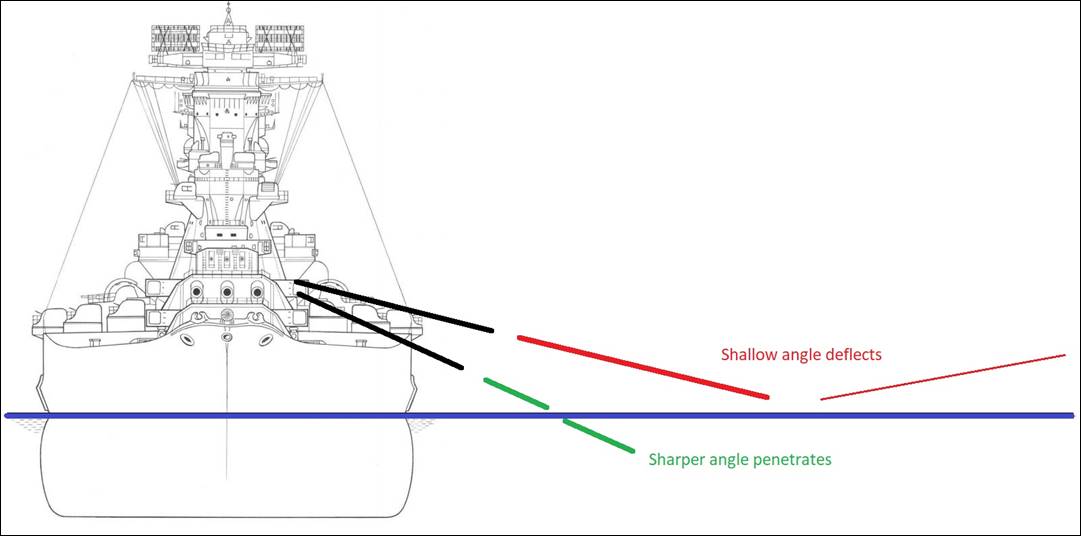
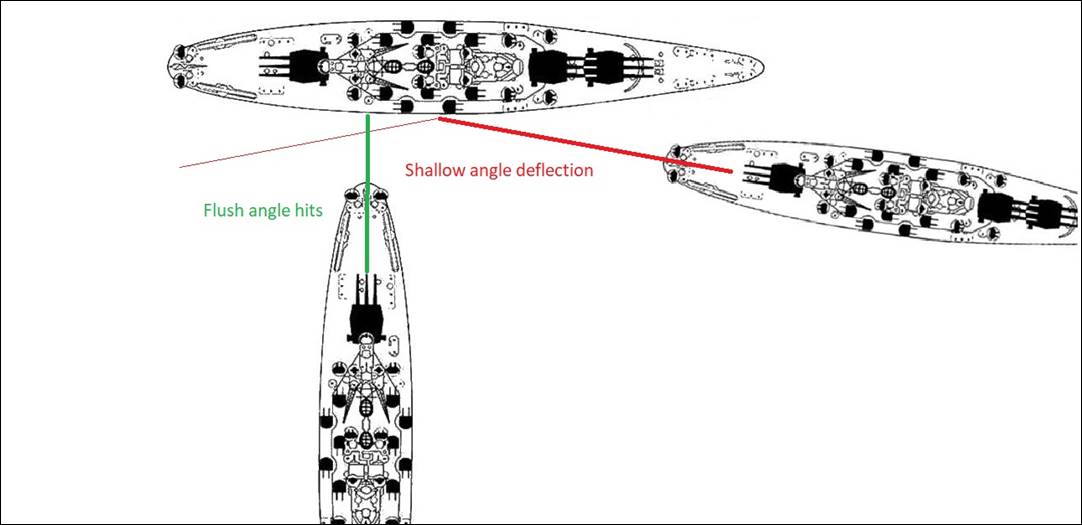
4. The angle at which a BB impacts a target or the water matters
significantly. Depending on the speed of the BB, shots that hit the water at
any less than 8-10 degrees will not go into the water but rather skip (Diagram
2). Similarly, shots that hit an enemy ship are prone to glance off the side at
high impact angles rather than flush angles (Diagram 3).
5. The maximum amount of depression on any gun is 20
degrees.
Diagram
2
Diagram
3
Relative
Gun Power: Discussion of Guns
Stern
Guns:
The
conceptually easiest place to start is with the stern gun. Stern guns are
designed to be fired into the stern 30 degree (15 degrees to either side of centerline)
quadrant of the ship. These are relatively low risk, low reward shots. The most
mobile part of your ship is pointed away from the enemy so you can run away if
need be. The ship you are targeting is not able to effectively return fire. A
single stern gun’s efficacy can be multiplied by shooting in groupings (double
stern guns that a typical cruiser will carry vs triple stern guns on a North
Carolina or Scharnhorst, vs quad stern guns of the King George V). When a 3
shot salvo is made to hit in a tight group it still only scores for 3 holes but
often times the balsa between the shots will be blown out, making for a higher
degree of effective damage which will make the ship sink faster. Another
advantage of most stern guns is that they have a larger effective range than
other guns. When set up properly, the shots will skim just above the water able
to inflict damage any where from point blank to
several feet off the stern of the ship. The most effective “traditional” stern
gun sits very low to the water and is aimed very parallel to the water.
Some
captains prefer to swing stern guns to the maximum of 15 degrees off center
line to try to either create a “poor man’s sidemount”
while adding as much gun depression as possible, or to improve angles of fire
able to cover the weaker side of the ship, typically angled away from the stern
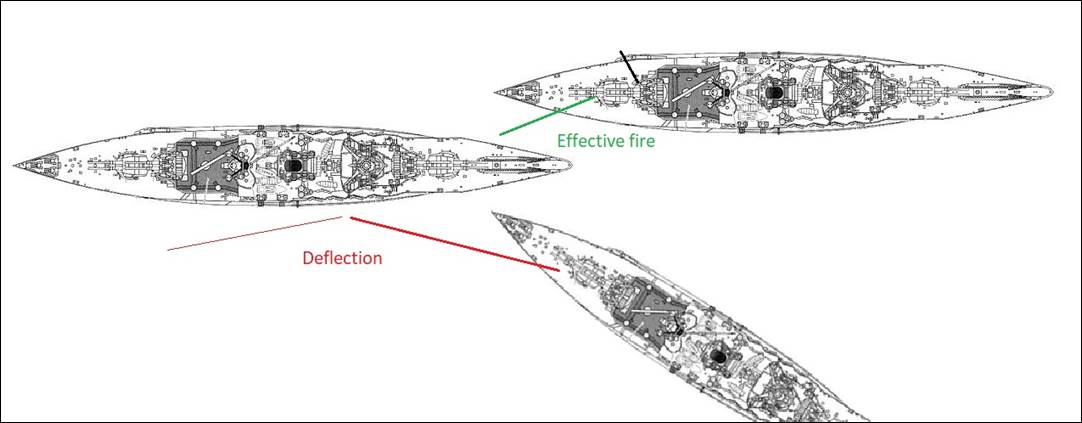
sidemount. Pitfalls of this approach are that the
gun’s effective range is significantly decreased, as are the effective angles
of fire if the goal is to have a low risk low reward easy to use gun. However,
though it is less flexible, some captains are able to score relatively
effective shots at very close range typically into the bow of the enemy due to
the natural angling of the bow of any ship, but in practice don’t really
consistently score below the water line hits and as previously discussed is
less effective at other angles due to a tendency to deflect (Diagram 4).
Diagram
4
Sidemounts
First
a word about side mounts in general. Due to physics and trigonometry, there are
various important factors regarding gun angles and placement. The consensus
goal of a sidemount is to shoot holes below the water
line of your opponent, making for higher scoring and more effectively damaging
shots that can sink their ship. It should be noted that shooting below the ship
is an obvious miss, while shooting aboves into the
hull are still a hit, just less valuable than the intended purpose of the gun.
The theory of the ship setup is the key: is the intention to score shots at
very close range which are easier to hit but risk your ship more, or to keep
the enemy at longer range where target hitting is trickier but risk your ship
less. Physical attributes of the ship such as height of the barbette off the
deck and height of the deck off the water in that section of the ship are also
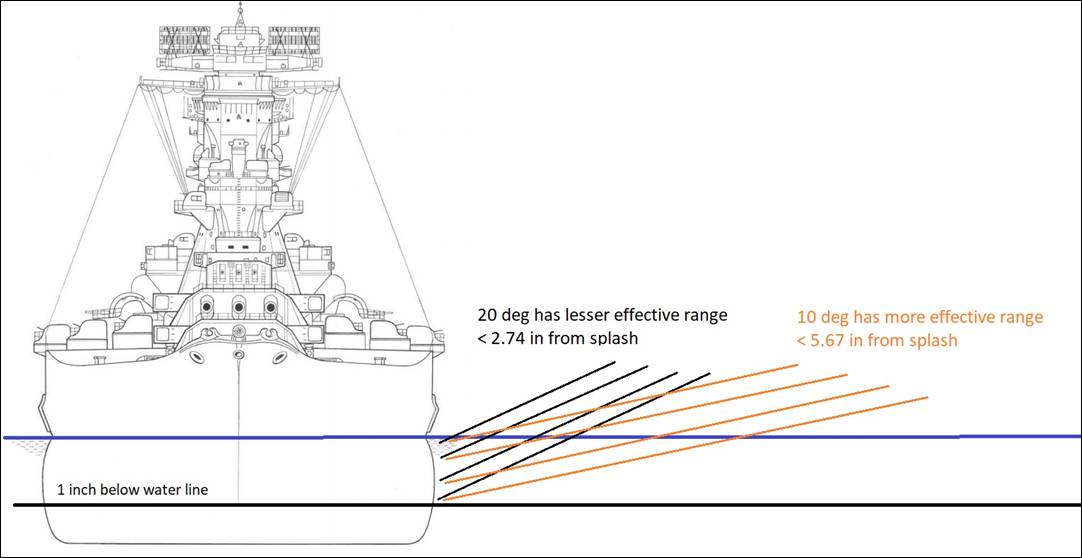
clearly at play. The higher the depression angle, the lower the effective
range, and the lower the depression angle the wider the effective range. At the
maximum allowable 20 degrees depression, a splash within 2.74 inches of the
side of the ship will score a hit, further away will go under the penetrable
area. These guns are most effective when touching or nearly touching the enemy
ship with your own. At 10 degrees depression, roughly the minimum effective
water penetration angle, a splash within 5.67 inches of the side of the ship
will score a hit. (Diagram 5)
Diagram
5
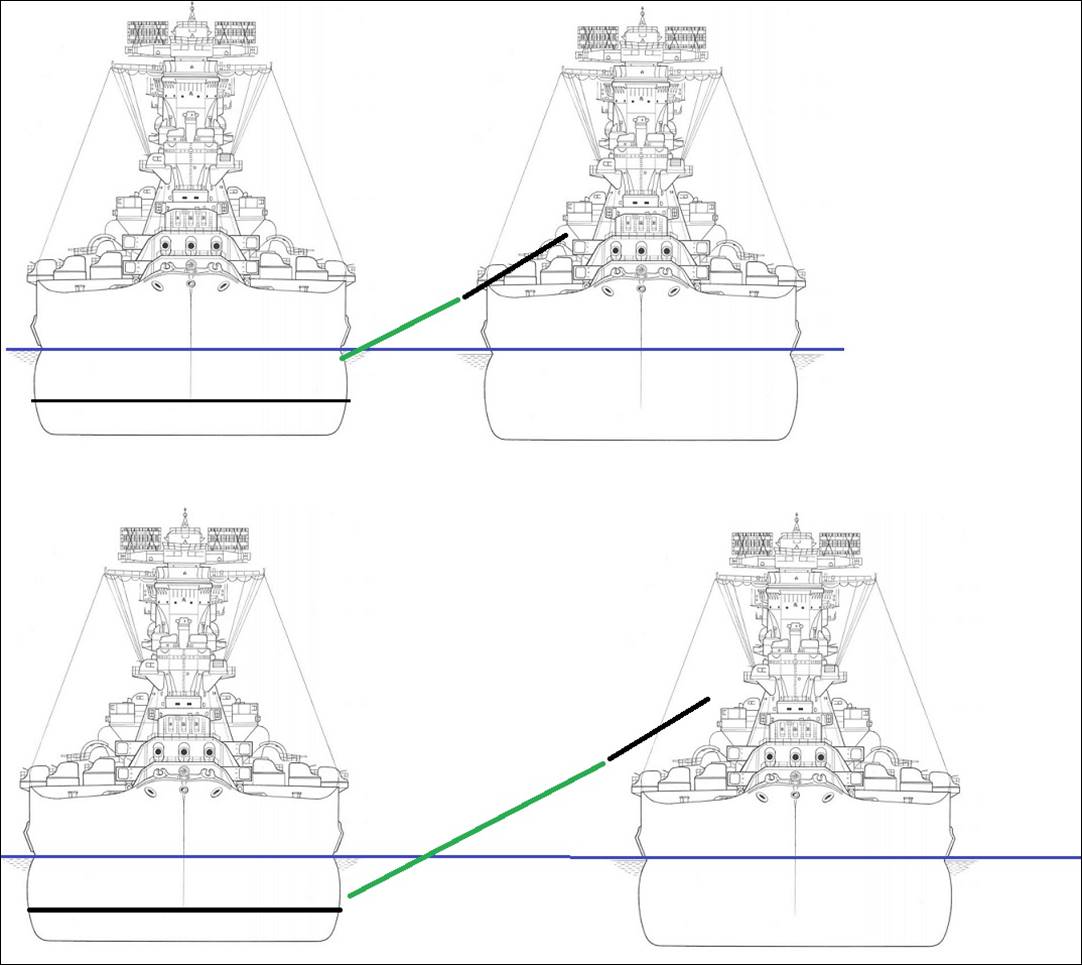
Furthermore,
the distance of the tip of the barrel above the waterline changes effective
range significantly, even with identical depression angles, which in turn effects
the ease/difficulty of targeting. This really becomes important when play style
is considered. For close range setups, the end of the barrel should be as close
to the water as possible. The limitation is that though you can hang barrels
off the side of the ship, it is sometimes disadvantageous to do so as other
ships can “grab on” to the barrel and control your movement. (Diagram 6: the black lines represent guns and
are drawn at the same angle, the elevation in the bottom example is exaggerated
for effect)
Diagram
6
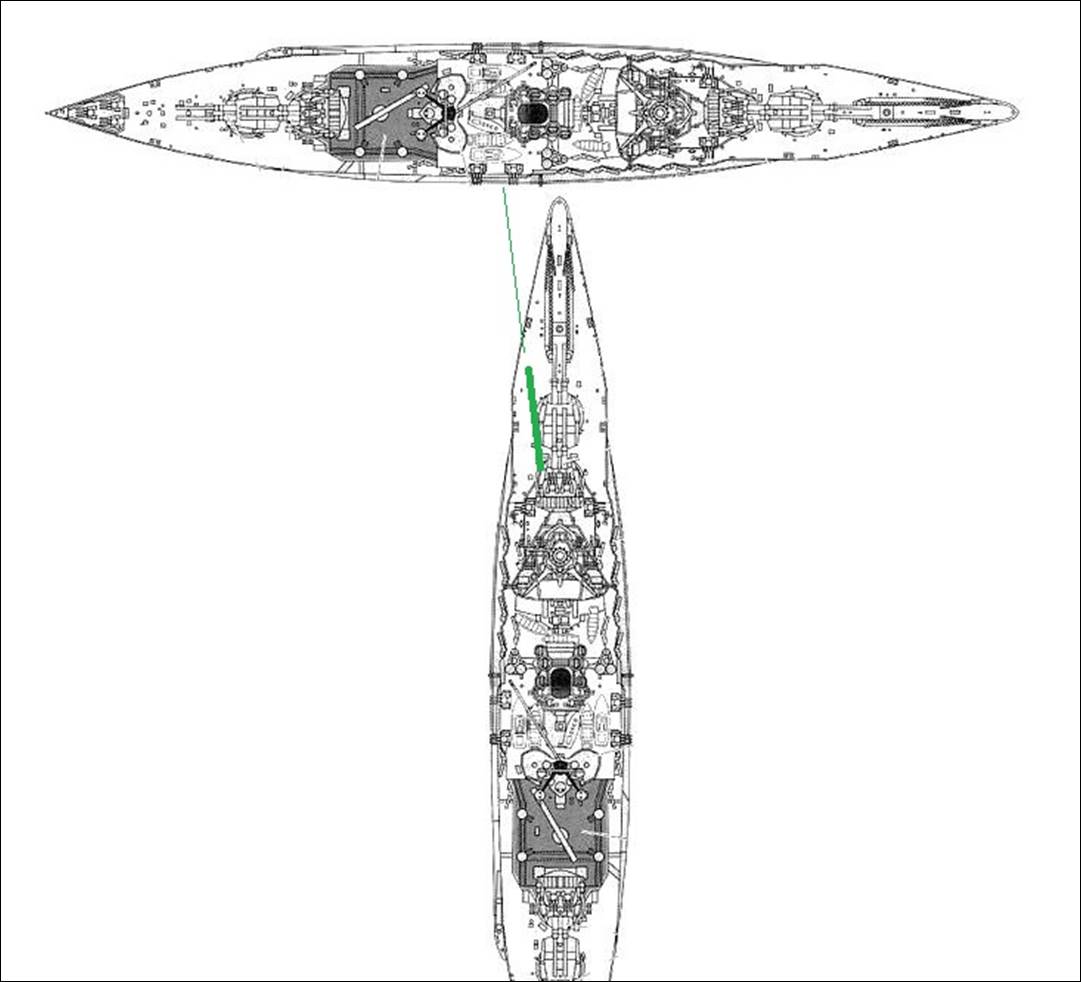
Similarly,
the angle of the sidemount in relation to the
centerline of the ship plays a role in flexibility of effective fire angles. I
prefer more flush to the edge of the deck at the location of the sidemount. The trade off is
usually that barrel length has to be shortened, decreasing projectile velocity.
Diagrams 7, 8, 9 below are examples of how this angle can yield a wider range
of effective fire, and thus more versatility.
Diagram
7
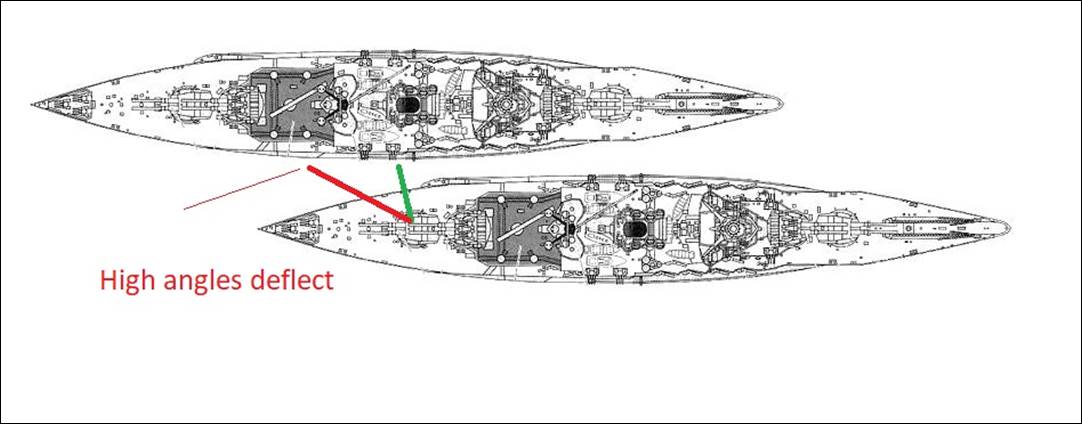
Diagram
8
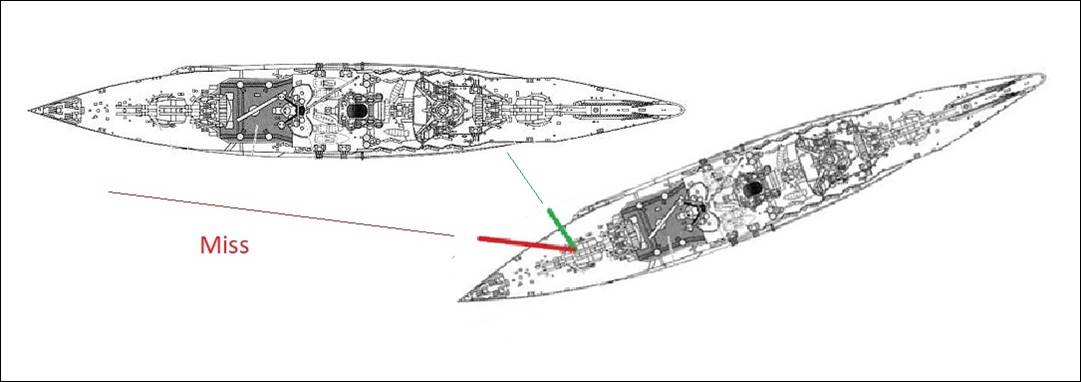
Diagram 9
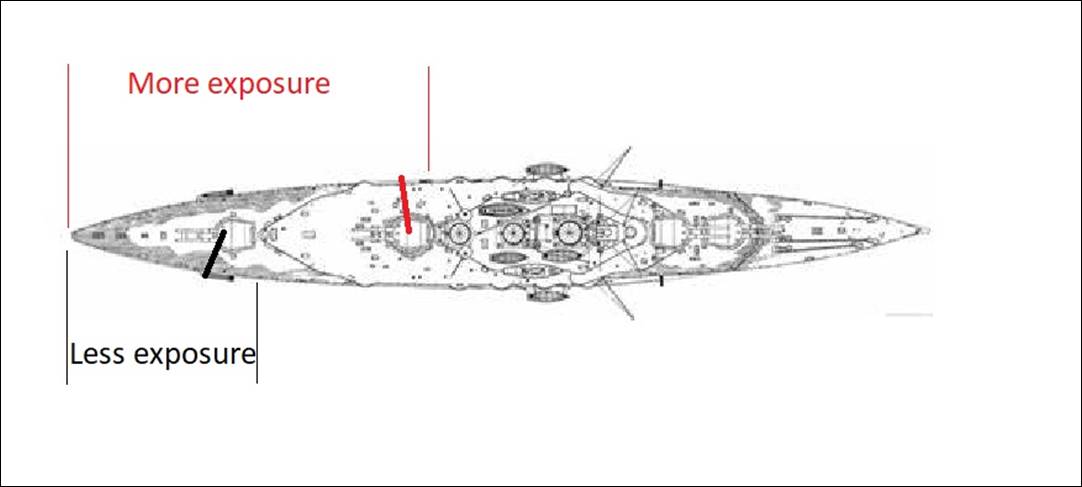
Another
important factor when placing sidemounts is
longitudinal turret placement. Side mounted guns placed further to the bow or
stern of the ship allow less of the ship to be exposed when shooting, and
turrets more toward the center of the ship make you risk a greater amount of
the ship. The Tiger as in Diagram 10 below makes for a good example of this
with a very centrally located turret.
Diagram
10
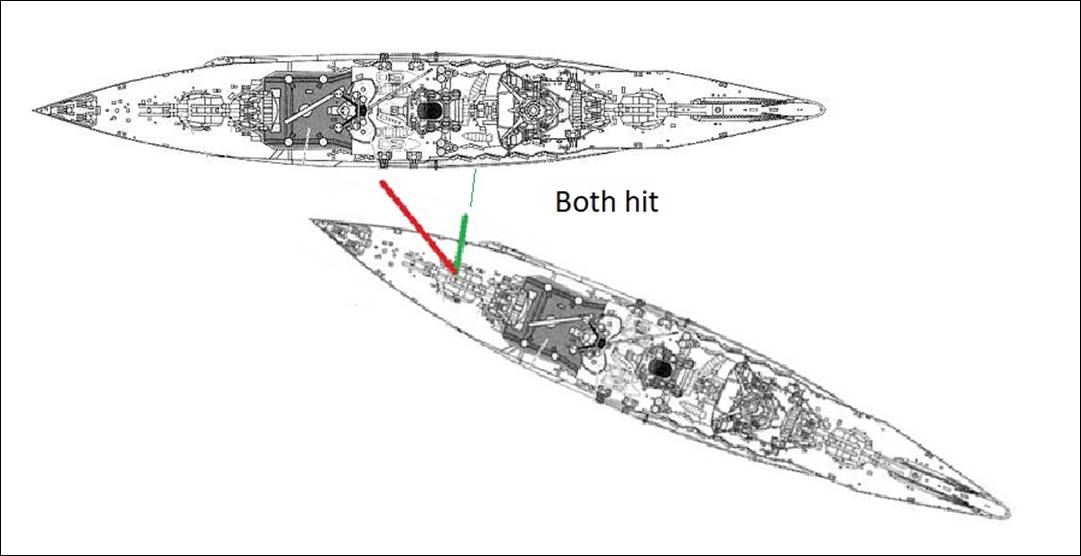
Stern Sidemounts:
With the aforementioned principles in consideration, it
becomes increasingly obvious why stern sidemounts are the most dangerous and
effective single gun in the hobby. The perfect location is such that they can
be mounted with the tip of the barel close to the water (ships sit lower in the
stern), with appropriate depression angles (most captains prefer closer range
and 20 degree depression), with appropriate angles off the side of the ship, and
as far to the stern as possible. Additionally to being esier to target, you
risk your ship less as compared to bow sidemounts in that you always have the
ability to disengage and drive away from the enemy if your stern rather than
the bow is engaging the target.
Bow sidemounts:
Conversely, as bow sidemounts naturually sit higher off the
water and are located in a less manuverable portion of the ship, bow sidemoutns
are a the prototypical high risk high reward gun. A good example of tactical play
is how I attempted to use my Derfflinger, it sits low to the water and has a well
positioned stern sidemount. As such, I would try to engage my stern sidemount
in exchange for the bow sidemount of a larger ship like a North Carolina, often
times I was sable to get completely under the effective range of a bow
sidemount and take no damage to the side of my ship in return. Bow sidemounts
must be battled cautiously if the enemy stern guns or stern sidemounts have
remaining shots. They are however highly effective and probably more effective than
stern sidemoutns for chasing down ships that have no shots left in the stern or
are otherwise wounded. Also, it is considered more acceptable to keep them
ranged out if that is congruent with the play style of the ship/captain, for
instance with a standard North Carolina setup.
Bow guns:
Traditionally, bow guns have been considered the weakest gun
in the hobby. They require you to position the most vulnerable part of your
ship directly at the enemy such that the only means of escape is to back out by
using the least manuverable movement of your ship. However, in certain
situations they can be advantageous as a high risk, high reward gun. An off
angled depressed bow gun can be made to hit right at or below the water line
off your bow. If the ship is manuverable enough and the captain is careful
enough, the enemy ship can be held in place while shooting below the water line
hits (Diagram 11). It is very easy to accidentally cause ram damage when doing
this and will often get your ship trapped, so this gun/tactic must be used with
caution or when other ships are trying to pin you in as a form of defense
rather than offense, but in some scenarios can be higly effective.
Diagram 11
Summary:
I’m not going to claim that any of the information or
opinions here are completely origional or definitive, but rather wanted to
explain the principles of how I tend to think about setting up offensive units
in my ships. These are guidelines that may not apply universally and there are
certainly other theories to justify setting ships up differently.
Tyler, 2/25/2021