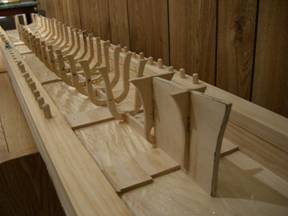
 I built a dry dock using a 1” x 8” as the
base and 3 1” x 2” ’s as the sides. I placed Saran
Wrap on the base under the sides to keep the CA glue from adhering to the
drydock when I attached the frames to the keel.
I built a dry dock using a 1” x 8” as the
base and 3 1” x 2” ’s as the sides. I placed Saran
Wrap on the base under the sides to keep the CA glue from adhering to the
drydock when I attached the frames to the keel.
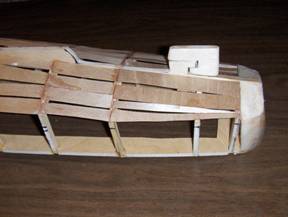
To keep the keel straight, I cut a 1” strip of baseboard trim into small lengths and laid them against the sides of the drydock and used shims to keep them tight.
The first frame (1B) is located 2” from the base of the bow. Something I would do differently next time would be to trim the divider forward of the first frame to follow the 2” line as the bow angles forward. I would also remove the solid divider between the first and second frames. It was meant to prevent a double penetration but given the weight issues I had when the ship was completed, I would use an alternate means of internal armor here.
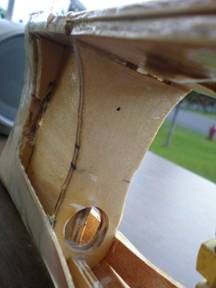 To prevent any issues with water tight
compartments, I cut away part of the first frame and made a large hole near the
base of the second frame. Next time I would cut open the frame as I did the
rest of the frames.
To prevent any issues with water tight
compartments, I cut away part of the first frame and made a large hole near the
base of the second frame. Next time I would cut open the frame as I did the
rest of the frames.
Andy Terpstra is building a
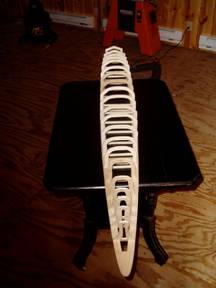
To reduce weight in the hull, I had to cut the keel and bottoms of the frames from just aft of the second frame up to where the bilge pump was located. I had earlier cut out the keel and frames from the bilge pump aft to where the accumulation tanks were located to allow the pump to sit as low in the hull as possible and to let the water flow from 1 side of the keel to the other. Altogether I cut 15 of the 20 frames, so you may want to consider Andy’s method.
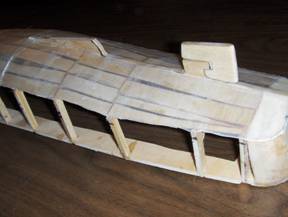
After attaching the subdeck to the frames, it was time to fiberglass the hull. Peter Ellison showed me what he calls the “CA method” of fiberglassing. You first apply strips of 1/64” along the bottom of the hull. Then you spray the hull with an adhesive. You cut the fiberglass cloth into small pieces and lay them on the hull. The adhesive keeps them in place while you then apply the CA to the cloth, allowing it to soak the entire cloth. When it is dry you can trim any excess with an Exacto knife.
I used 3 layers of the heavy fiberglass cloth (.5 pound/yard). I found the lighter weight cloths too hard to work with.
The rudder design in these photos matched what was on the plans. Based upon on the water performance, I have changed the design to a standard shaped rudder and cut the rudder support off of the keel. The improvement in performance was noticeable.
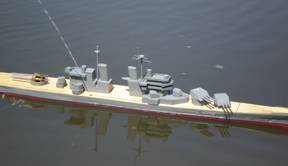
Here is a picture of the ship on the water. Note the location of the bilge pump discharge. Internally, the CO2 bottle is under the forward turrets, followed by the radio box, battery and bilge pump. The aft superstructure is removable to gain access to the test switches for the guns and the tops of the magazines. The motors and gear boxes lie under the magazines, followed by the guns, the accumulation tanks/solenoids and the rudder box.
The  accumulation tanks, changing from a 7.5 amp
to a 4.5 amp battery, rewiring the receiver to run off the main battery instead
of having its own battery in the radio box, removing the forward turrets (they
are actually Des Moines turrets from Battler’s Connection) with stainless steel
barrels and rebuilding both
accumulation tanks, changing from a 7.5 amp
to a 4.5 amp battery, rewiring the receiver to run off the main battery instead
of having its own battery in the radio box, removing the forward turrets (they
are actually Des Moines turrets from Battler’s Connection) with stainless steel
barrels and rebuilding both
superstructures out of CA fiberglass.
One thing I found is there was plenty of help where I needed it. Peter was scratch building The Mighty German Battlecruiser (TMGBC) Sharnhorst and provided a lot of hull building advice. Bob did all of the wiring and soldering as I am clueless in those areas. Ron Horbul provided tools and building space at his shop during our winter construction meetings. Larry (Lars) Dahl and Ben Radenbaugh, among others, provided valuable counsel and advice.
 I decided to scratch build my first ship for
2 reasons. One is that I wanted to build the
I decided to scratch build my first ship for
2 reasons. One is that I wanted to build the
But finish it I did, and sailed her twice this year. I am looking forward to completing the weight reduction project and getting her back out on the water.